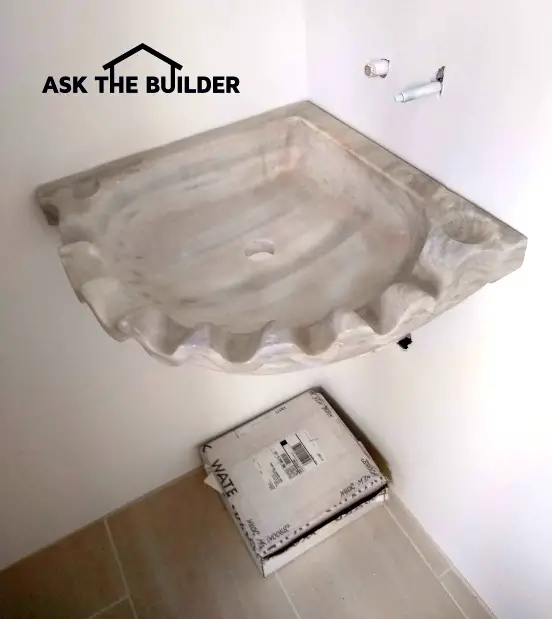
This heavy antique fancy sink seems to be suspended in midair! (C) Copyright 2020 Tim Carter
DEAR TIM: I need your help solving a perplexing conundrum. I love all things old and have purchased a salvaged antique marble stone corner sink that I want to use as a powder-room lavatory. It already has a drain hole, so that’s not the issue. The faucet needs to be in the wall and I can handle that as well. My problem is I want the sink to appear as if it’s floating in the air with no visible means of support. The sink is really heavy, as it weighs close to seventy pounds. What can be done to achieve my goal and what other tips do you have to make sure this goes well? Are there any hidden problems you might know of I need to avoid? Sharon F., Key Largo, FL
Years ago I used to purchase quite a few salvaged building materials for some of my projects. I was so lucky to have a specialty business near me that foraged for one-of-a-kind building fixtures, doors, mantles, sinks, etc. in buildings slated for demolition. They had so many things you simply couldn’t believe it. One day I found a stunning solid-walnut fireplace mantle I incorporated into the last home I built for my family.
Installing an antique sink shouldn’t be a problem at all. I’ve been a master plumber since age 29, and I’ve had the good fortune to install one or two in my career. When deciding to purchase one, you usually just have to make sure the holes for the drain and faucet will work with modern parts. Even if a hole is too small, it can usually be enlarged with minimal effort.
The other thing you need to do is to be sure the sink is going to fit really well in the space where it will end up. Recently I had to install an antique sink corner sink in my daughter’s new home. I uncrated it to inspect it and to create a template because I wanted to see if the sink itself was square and would fit nicely in the corner of her powder room.
Guess what? The old sink was about 1.5 inches out of square in just 30 inches! That’s a huge discrepancy. A rookie might have assumed the sink was square and been in for a surprise once the sink was lifted in place. I made a template of the sink using scrap cardboard and then padded out the wall studs to account for the out-of-square sink. After the drywall was installed the sink fit perfectly. All I had to do was squirt a small amount of caulking to seal the gap between the sink and the wall.
My daughter wanted the sink to float on the wall just like Sharon does. I was able to locate a company online that sold these very heavy steel brackets that screw to the sides of wall studs. A 1/4-inch-thick steel plate extends out into the room that the sink can rest upon.
I had to install two of these, one extending out from each wall in the corner. The challenge was to make sure the brackets didn’t block the drain hole, didn’t extend too far out so as to be seen, and finally so they didn’t touch one another. Believe me, this exercise took some planning!
If you do have a conflict where the brackets don’t fit perfectly, you may have to install an extra wall stud, move one, or cut off a small amount of one bracket to resolve the issue. In all cases, you’ll be able to figure it out. Realize the 1/4-inch thickness of the steel plate is a non-issue. Even sitting on the toilet looking at the sink, you can’t really see the steel and you wonder how in the world the sink is not crashing to the ground.
Before the sink is installed, I highly recommend that you apply multiple coats of the best clear stone sealer you can purchase. Local businesses that fabricate granite and stone countertops sell this product.
You need to seal the stone before anyone touches the sink because plumber’s putty, caulk, etc. may have ingredients that can soak into the stone and permanently discolor it. After all this hard work, it would be a shame for that to happen.
When sealing the sink, seal all surfaces. Seal the top, the basin, the inside of all drilled holes, and even the underside and back surfaces. Follow the instructions on the sealer label to see how to apply multiple coats of sealer. You’ll never regret taking the time to do this. Remember, workmen almost always have dirty hands and your sink may be one-of-a-kind. It’s not like you can go to the home center and get a replacement after all.
Be sure the steel brackets have been painted several times so there’s no chance the steel can rust. You don’t want rust stains bleeding through the natural stone.
Before you set the sink on the brackets, do a dry fit. Carefully place the sink to ensure it fits, it’s level and all is well. Once you’re satisfied, then you can squirt adhesive from a caulk tube onto the steel brackets and maybe a little bit on the back surfaces of the sink where it contacts the wall.
Place the sink on the brackets, slide it against the wall and put a sign on it DO NOT TOUCH so no one touches the sink until the adhesive dries. You’ll love your new sink, and I’d love for you to send me a photo of the finished installation!
Column 1343
The post Magic Wall-Hung Fancy Sink appeared first on Ask the Builder.
Via Home http://www.rssmix.com/
No comments:
Post a Comment